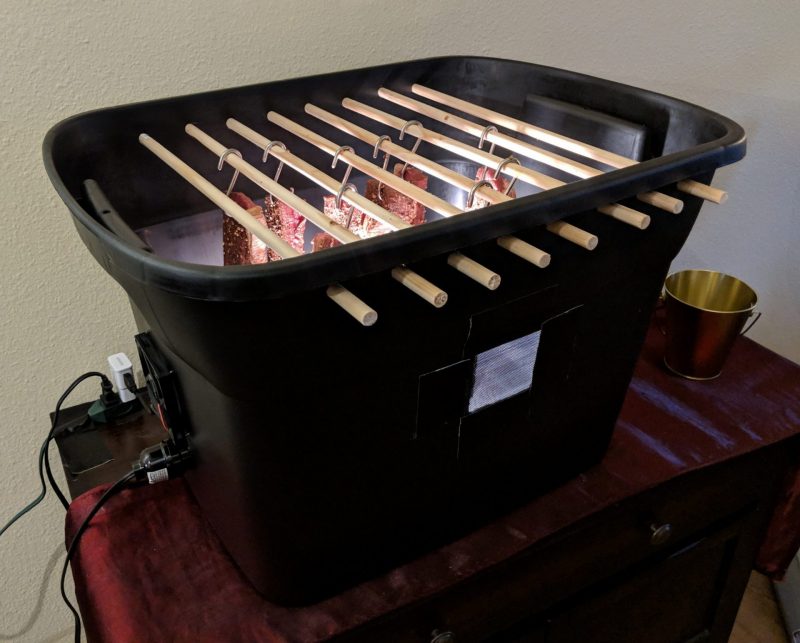
how to: Biltong box
Materials
- A Sterilite box of any size ($7)
- 2 x 80mm USB computer fan.($16)
- USB extension cords ($7.09)
- 80mm Fan dust filters ($7)
- 8 x 1/2 inch dowels ($7.08)(at least an inch or two wider than your sterilite – I got 4, 48 inch long dowels and had them cut in half)
- A clamp light ($6.97)
- 40w incandescent bulb (non-energy saving) ($2.97)
- Gorilla tape
- Masking tape
- Meat hanging hooks
- TOTAL – $54.11

Let me start by assuring you that this process is really really quick and easy.
First off, gather your materials. For the most part, everything is cheaper and easier to get on Amazon but you will want to pop in to Target, Walmart, or Big Lots for the sterilite and Home Depot for your dowels, clamp light, and light bulb. The sterilite listed in materials is similar to the one I used but any size will do. Try to make sure that it’s as tall as possible to ensure that there is enough space for the clamp light and the long, dangling pieces of meat.
Wooden dowels are really affordable at Home Depot and they’ll cut them down to size for you for free. I got 4 dowels, had them cut them in half, then cut off the ends to get them down to 20 inches. I also grabbed a clamp light and 40w bulb at the same time.

Once you have all your materials, you’re ready to start marking your cuts.
Step 1
Tear off a piece of masking tape, hold your clamp light with the aluminum shield about an inch above the bottom of the short side of your box. Use the masking tape to mark off the middle of the light on the box.
Take your light apart by unscrewing the aluminum shield. You can throw away the clamp portion. Add masking tape to your masked off spot, hold the circular black portion of your clamp light to the mid-point you noted before, and draw around the circumference.
Step 2
Use the masking tape to make a square the size of the fan, a couple inches above the light circle. Hold one of the fan dust filters against the tape and draw around the outline. Then freehand a circle or draw a smaller square. Make sure that you’ve left enough space for the screws to attach the fan. Duplicate this step on the exact opposite side of the box so you have a location for your second fan to draw warm air through the box and out.

Step 3
Hold a strip of masking tape in front of the long side of your box and tear off a piece that is a couple inches shorter than the length on either side.
Lay your strip down on the table, pull out your measuring tape, and mark lines every 2 inches. Draw a straight line through all your markings so you have a nice X showing where to drill. The number of markings will depend on the length of your box but mine had enough space for 8. Tear off another piece of tape the same length and duplicate the markings on it.
Take your first strip and press it onto your box about an inch down from the top. Make sure that the dowels will not get in the way of the lid.
Take 2 of your dowels and lay them on top of the box with one lined up with the first marking and another with the one on the other end. Use this as a guide to press down your second strip of tape markings on the other side of the box.
Step 4
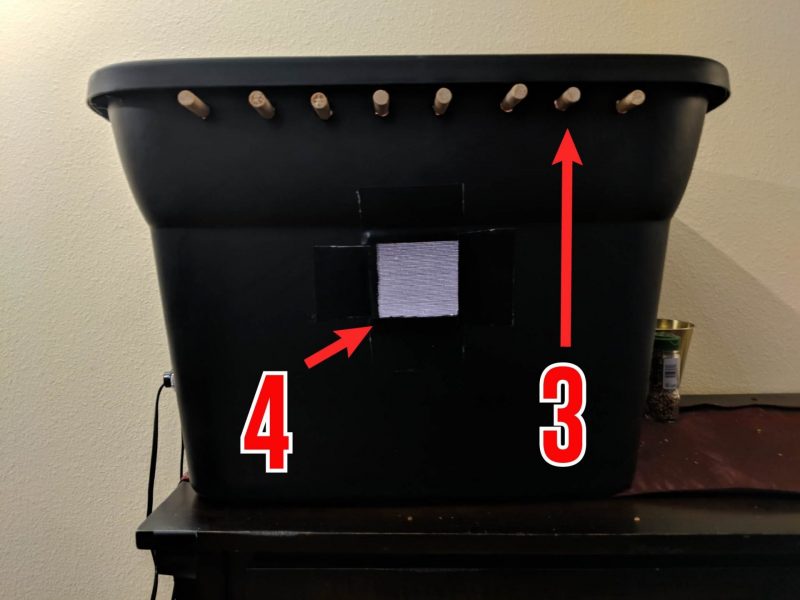
Lay out another square of masking tape in the middle of the long side of your box. Press your fan dust filter to it and make a square outline. Draw a slightly smaller square inside it to cut out. I did this on the out facing side for airflow into the box and to provide a little window to peek in.
You are now ready to cut and drill!
I found that the easiest way to cut this plastic with box cutters is to push the blade into your marking, pull it out, move it along the line a bit and push it in again. Then you can drag the blade through the indentations you’ve made and give it a good bash with the end of your box cutters to pop the cut piece through.
Cut out your 2 fan holes, your light hole, your vent hole, then grab your drill and make 1/2 inch holes in your tape markings on the long side of your box on either side.
Sanitize!
Now that you’ve cut everything, make sure to sanitize your box. Stick it in a bathtub and give it a good scrubbing with dish soap or just wipe it down well with antibacterial wipes. I did both because I don’t want anything contaminating my biltong!
Now comes the fun part.
ASSEMBLY!
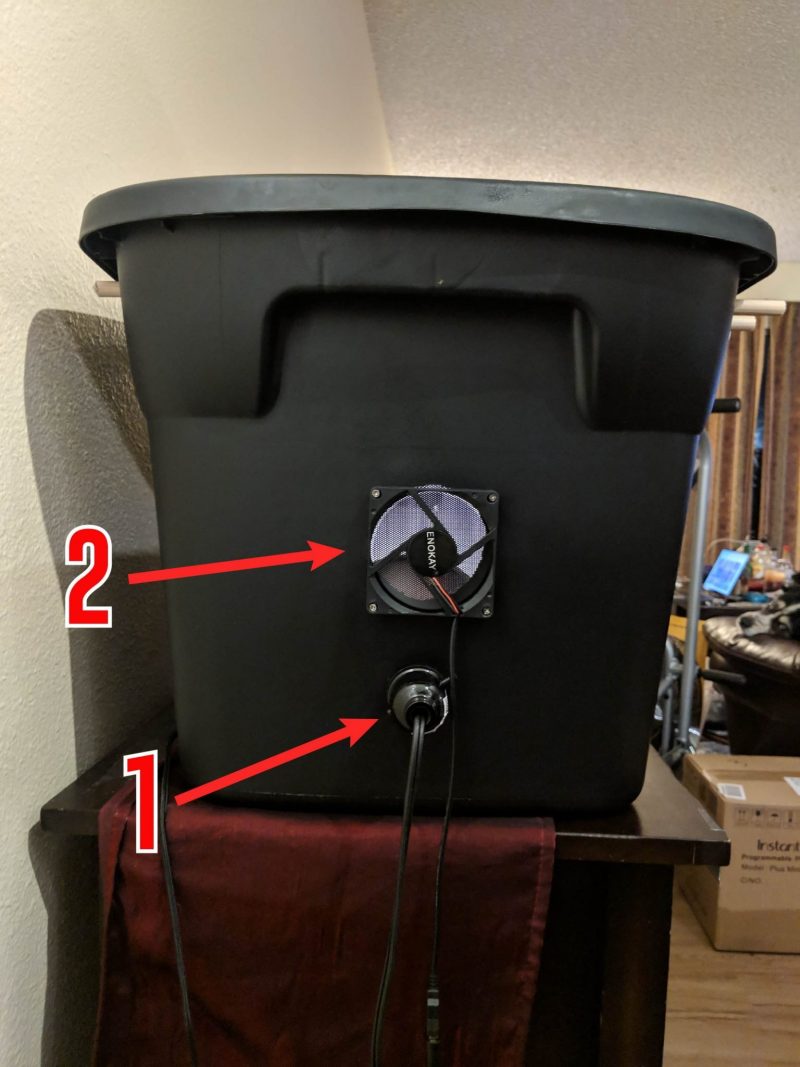
Start off with attaching the computer fans to the outside of the box. Make sure that the fan will be pulling air out of the box. I found the easiest way was to hold the box between my legs, hold the fan against the first fan hole I made, and drill through the screw hole for the fan and through the box. I then screwed that hole with the provided screws and drilled the rest of the holes. Before I added the nuts on the ends, I squeezed a fan dust filter over the protruding screws on the inside of the box. This will keep dust and debris off your biltong.
Do the same for the fan hole on the opposite side.
Now attach your clamp light. You’ve already taken it apart so all you have to do is press the circular black portion into the hole in your box and attach the aluminum shield on the inside.
Use gorilla tape to attach the fan dust filter to the vent hole you cut on the long side.
And, finally, push your dowels into the holes and across to the opposite side.
That’s it! You’re done!
It probably took me longer to write this than it did for you to make it!
Now if you’d like to know how to start actually making your biltong, read on!

Simple biltong recipe
Pick up some round roast. I get mine from Costco and it looks like this picture. It comes in a pack with 2 hunks of meat. It’s about $18 for 7 lbs and my biltong box holds 2 packages with strategic hanging
You can use whatever meat you want but cheap meat is perfectly fine. Just look for a thick chunk of meat with little to no fat running through it but a nice strip of fan on one side.
STEP 1:
- Cut your meat into strips about 1/2 inch thick.
- Pour a very thin layer of apple cider vinegar (or any vinegar) into your deep dish and make sure all your strips are coated. You want them to be glistening but not dripping. Make sure there is no extra vinegar at the bottom of the dish. Pour it out if need be.
- Sprinkle your meat with the Safari Biltong Spice and rub it in.
- Cover and leave in your fridge for 24 hours.
STEP 2:
- Pour your coriander seeds into a pan and heat them at mid heat to toast them. Don’t add oil or anything, just make sure to shake the pan around a bit.
- After a couple minutes, take them off the heat and crush them or stick em in your bender for a light swirl. You want to crack the seeds open and release that signature biltong smell. I throw mine in the blender. I end up with a little bit that is over blended but it adds to the flavor.
- Pull out your marinaded meat, cover each slice liberally with cracked coriander seeds and pierce them with hooks.
- Place some paper towel in the bottom of your box to catch the drippings and hang up all your meat, making sure that no pieces are touching as this could allow mold to grow.
And that’s it!
After a day, you’ll want to check your meat each morning and evening. Just give it a squeeze. I like my biltong wet and pink in the middle. On the outside this feels firm but slightly squishy.
You can take a piece out and cut off a slice to test it. If it’s too pink for you, you can just hang it back up for longer.
I hope these instructions were easy to follow and that you enjoy making (and eating) biltong as much as I do!
**The actual set up of your box can vary based on where you are. Test out a couple batches with this set up first. If you’re somewhere very dry, you may prefer to run this without the light on or with just one fan going for a slower dry. I’m in high and dry Colorado and this has been a successful unit for me. My biltong dries between 2-4 days, depending on how close it is to the light.